Scheduling Appointments with Starfish

Starfish makes it easy to view office hours, schedule appointments, and find drop-in times for advising, financial aid, tutoring, and many other folks and services on campus. Please review the collection of videos. Hint: scheduling is pretty much the same throughout the system.

Scheduling Resources

Video: Make an Appointment with your Advisor (2:12 mins)

Transcript

Video Topic: Scheduling an Appointment with an Advisor in Starfish

[00:00] Logging In

To make an appointment with your advisor, log into Starfish. Your login credentials are the same username and password used for:

  • Campus computers
  • Campus Wi-Fi

[00:11] Non-Speech Audio

[Music plays briefly]

[00:14] Navigate to My Success Network

After logging in, you will land on the My Success Network page.

On this page, you can find:

  • Your advisor(s)
  • Your instructors
  • Other support providers connected to you

You will also see your Services section.

[00:14] Locate Your Advisor

To schedule an appointment:

  1. Find your advisor listed under your connections
  2. Select the three-dot menu next to their name

[00:29] Start Scheduling

Choose one of the following options:

  • Select “Schedule” from the menu, or
  • Open your advisor’s profile page and select “Schedule an Appointment” on the left side.

[00:45] Select Appointment Type

A list of appointment types will appear.

Some advisors support multiple programs.
➡️ Make sure to choose the appointment type that best matches your needs.

You can expand options to see more details.


[01:01] Choose Appointment Reason

To view available reasons:

  • Select the arrow icon to expand options
  • Choose the reason for your visit

[01:09] Continue to Time Selection

  1. Select your appointment
  2. Click “Continue” (bottom right)

You will now see available time slots, typically within the next 1–2 weeks.


[01:18] Select Date and Time

  • Choose a time that works for you
  • Click “Continue” (bottom right)

[01:25] Review Appointment Details

Confirm the following information:

  • Date and time
  • Location
  • Reason for the visit

If needed:

  • Select “Change” to modify the appointment reason

[01:42] Add Additional Notes

You may enter a short message explaining your needs.

✅ Providing details can help your advisor prepare for your appointment.

[01:42] Finalize Appointment

Click “Confirm” (bottom right) to complete your booking.

[01:51] After Confirmation

Once scheduled, you can:

  • Change the appointment
  • Return to the Services page
  • View all upcoming appointments

[02:01] Non-Speech Audio

[Music plays]

[02:02] Managing Appointments

You can view your upcoming appointments in your dashboard.

To make updates:

  • Select an appointment to cancel or modify it

Video: Scheduling General Service Appointments in Starfish (1:55 mins)

 
Video Topic: Scheduling General Service Appointments in Starfish

⏱️ Video Timeline and Content

[00:02] Introduction: When Advisor Selection Matters

For advising appointments, it’s important to schedule with your assigned advisor, who is listed in your Connections.

However, for some appointments, the specific person you meet with does not matter. You only need to schedule with the office.


[00:10] Finding Services (Example: Financial Aid Office)

For services like the Financial Aid Office, locate the service tile under your Services section.

You have two options:

  • Select “Schedule” from the bottom-left corner of the service tile, or
  • Open the full Services page to view additional details, including staff and service descriptions

[00:27] Scheduling a Service Appointment

After opening the service:

  • Click “Schedule an Appointment” using the button on the left

This will display available appointment types.


[00:35] Selecting an Appointment Type

  • Choose the type of help you need
  • Click “Continue” to proceed

[00:44] Choosing a Date and Time

  • Select an available appointment time that works for you
  • Click “Continue” again

[00:52] Confirming Appointment Details

You will be asked to review and confirm your appointment details, including:

  • Date and time
  • Staff member (if applicable)
  • Appointment location

[00:59] Choosing Appointment Location

Some offices allow multiple appointment formats.

For example, at the Financial Aid Office at South Seattle College, you may choose:

  • In-person appointment, or
  • Phone appointment

Select your preferred location.


[01:14] Adding Appointment Notes

Provide additional details about the reason for your visit.

✅ Tip: Adding more information helps the service provider better understand how to assist you.


[01:20] Final Confirmation

  • Click “Confirm” at the bottom right

Your appointment will now be scheduled.


[01:28] After Scheduling

After confirmation, you can:

  • Change the appointment
  • Return to the Services page
  • View all upcoming appointments

[01:45]

[Music]

Frequently Asked Questions

All appointment and scheduling confirmations will come from the email address seattlecolleges@calendar.starfishsolutions.com. Add this email to your contacts to ensure none go to junk or spam.

Contact information in Starfish is automatically updated from the contact information students have in their ctcLink student account. 

  • Email: Students automatically receive emails and notifications sent through Starfish to both their Seattle Colleges and their preferred email address (as indicated in ctcLink).
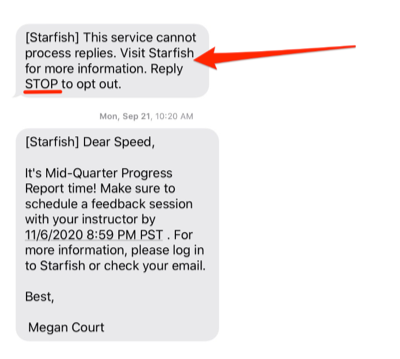
  • Text Messaging: Students will also receive messages about upcoming appointments and other critical items from student services via text message. Text messaging is one-way communication. Students cannot reply to the sender via text.

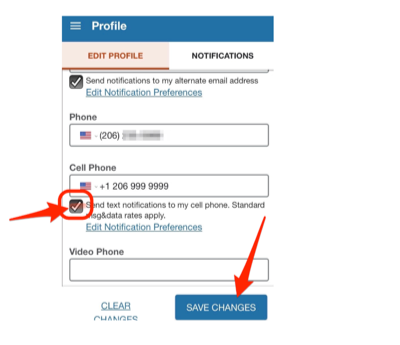
To opt out of receiving text messages through Starfish, reply STOP to the most recent text message or update your notification preferences in your Starfish Profile.

Text Message Example from Starfish
Text Message Opt Out


Student Starfish Profile with cell phone opt out
Change notification settings in your profile.

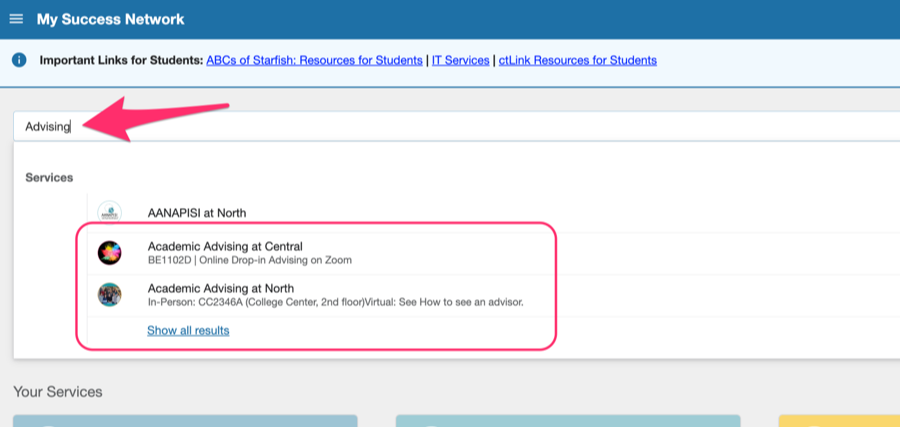
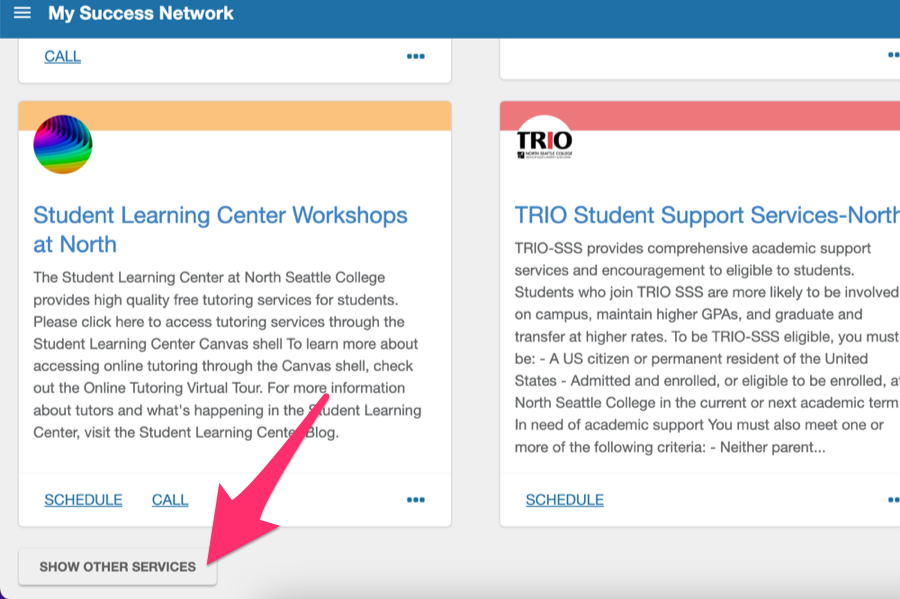
Don’t worry if you don’t see an advisor in Your Connections. Advisors can work with all students. Simply find the advising office at your campus using the top search box or by scrolling to find it in your services (you can also click SHOW OTHER SERVICES to see ALL services) and schedule with the advisor who advises for your area of study or any other advisor. They can help get you connected with your academic advisor.

Use search box to type in the service you need
My Services page showing top search box.


Arrow pointing to Show Other Services button to expand services.
Arrow pointing to Show Other Services button at the bottom of the Services page to expand the service selection.