Zoom
Overview
Zoom is a video meeting tool that allows you to interact with students in real time. This can be part of hybrid courses, enhance asynchronous courses, and serve as a backup when campus is closed. Sessions can be recorded for students who missed class. Students can watch the session and take a quiz to demonstrate their understanding of the recording.
You must request an account through eLearning in order to use a Pro Licensed Zoom account.
Quick Guides
Quick Guides
Learn how to use accessible features in Zoom, including captions, live interpreter, display settings, keyboard shortcuts, screen reader support, and more! These are all easy tools to enable.
Follow the instructions on Zoom's Personal Meeting ID page to create, change, and/or use your own Zoom room. A personal Zoom room can be helpful for class sessions, office hours, and other meetings that you host.
We recommend a meeting ID that is easy to remember, such as your name or office phone number.
- Download Zoom
- Get Zoom help
- Update Zoom
- Watch Zoom video tutorials
By using a password-protected link, you are adding an extra layer of security. Here is a quick way to create a password-protected link when scheduling Zoom meetings. This how-to video also shows how to find the link again.
Here is a guide to changing the password.
Posting this password-protected link in your course means that only students enrolled in your course can access your Zoom classroom. Here is a guide on how to add your Zoom link to your Canvas course or use this how-to video.
The Waiting Room is just like it sounds: It's a virtual staging area that prevents people from joining a meeting until the host is ready. Meeting hosts can customize the waiting room settings, including a welcome message. Here is a quick start video, detailed guide to waiting rooms, and Zoom’s own waiting room instructions.
For specific reasons, such as an emergency or inappropriate content, there may be a need for you to disable a participant's video. Learn how to do this in the video below. Please note that you are only able to do this with Host and Co-Host privileges.

How to record sessions
This short video will show you how to record a Zoom session. Here are written instructions for starting a recording and pausing or stopping a recording.
Set up where recordings are stored
Here is how you tell Zoom to store recordings on your computer - the one you are using for the Zoom session.
You can also use the first part of this video (0:00 to 1:35) as a guide.
Share Zoom recordings from your computer
Zoom does not offer a guide for uploading recordings into Canvas and Panopto, so eLearning has created step-by-step videos for faculty. The second part of the video that is embedded above (3:00-5:45) shows you how to convert the file and upload it into Canvas.
Share recordings from the Cloud
Here are the steps for finding and sharing your Zoom recording when you record to the cloud: access your recording in the cloud, download your recording from the cloud.
Zoom does not offer a guide for uploading recordings into Canvas and Panopto, so eLearning has created step-by-step videos for faculty. This 5-minute video walks you through all the steps via screenshare and verbal directions:
Panopto is a tool that lets you create teaching materials as videos. This tool is particularly helpful when you flip your classroom or otherwise make educational materials available to your students on demand.
Your Zoom meeting recordings can be shared through Panopto inside of Canvas. The following is a semi-automated option.
In your SeattleColleges Zoom account (the one you login with your SeattleColleges.edu login name), record a Zoom meeting, and select the “Record to the Cloud” option. 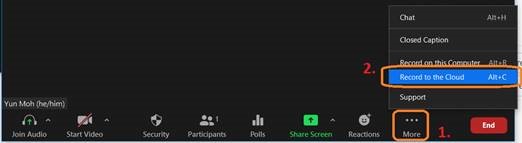
After ending the meeting, it will take a few minutes to process. You will receive an email from Zoom. That means it is ready.
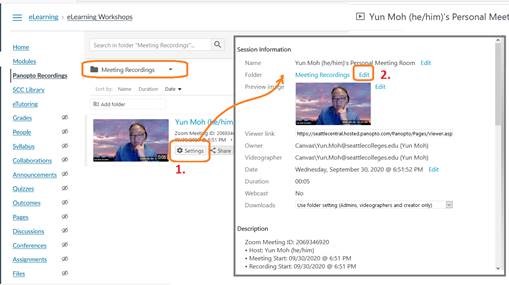
Login to Canvas and click the Panopto Recordings button in the course-level navigation bar. Click the folder drop-down arrow. Select the “Meeting Recordings” folder. 
You have many ways to share that video.
One is moving it to the Panopto folder/Canvas shell. Hover over the recording, and then click the Settings button. On the Session Information window, click the Edit link next to the Meeting Recordings folder. Then, select the target folder that represents the Canvas shell/course.
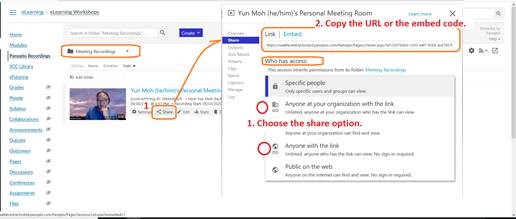
The other option is changing the share option. Hover over the recording, and then click the Share button. That will open the Share tab. Select the Who has access: option. Then, copy the link or embed codes to share.
This tutorial also teaches you how to convert and share your Zoom recordings via Panopto.
Here is a quick way to create a recurring meeting in the Zoom desktop app: